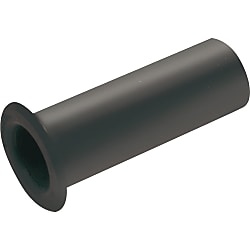
Rubber Bushing for MS Connector Cable Clamp MMS3420 (Part Numbers - CAD Download)
- Volume Discount
- MIL

<<Amazingly Low Price>>
● Check the price first.
● Can also be used for products from other manufacturers as long as they are cable clamps compliant with MIL standards.

· Rubber bushings come with the cable clamp. Select the same size when replacing rubber bushings. Select one size smaller than the accessory when using more than one.
Part Number
Once your search is narrowed to one product,
the corresponding part number is displayed here.
MMS3420-4
Part Number
|
|---|
| MMS3420-4 |
| Part Number |
Standard Unit Price
| Minimum order quantity | Volume Discount | Inner Diameter (Cable Extraction Port Diameter) (mm) | |
|---|---|---|---|---|---|
0.59 € | 1 | Available | 5 Days | 5.59 |
Loading...
MIL Standards MS Connector
Common Specifications
Applied Wire Size and Contact Size
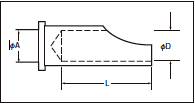
Applicable wire coating strip length is about 1 to 3 mm plus the soldering hole length (L dimension) of the contact. In addition, the L dimension and D dimension are the same for the male connector (pin) and female connector (socket). Also, confirm whether the cable will fit into the internal diameter of the cable clamp when selecting cables.| Contact | Conforming wire size | ||||
|---|---|---|---|---|---|
| Contact size | Soldering Hole Diameter øD (mm) | Pin Contact Contacting Part Diameter øA (mm) | L (mm) | AWG | Conductor Cross-Sectional Area (mm2) |
| #16 | 1.85 | 1.6 | 6.4 | 16 to 20 | 1.25 or Less |
| #12 | 2.95 | 2.4 | 9.5 | 12 to 14 | 3.5 or Less |
| #8 | 5.31 | 3.6 | 12.7 | 8 to 10 | 8 or Less |
| #4 | 8.45 | 5.7 | 15.9 | 4 to 6 | 22 or Less |
| #0 | 11.91 | 9.1 | 15.9 | 0 to 2 | 50 or Less |
Electrical Characteristics
| Contact Resistance | Contact size | Test Current DC | Voltage drop | Meets the left value when it is measured with the fall-of-potential test method where the male and female connectors are coupled in the same way as in use and a test current is energized. |
|---|---|---|---|---|
| #16 | 20 A | 21 mV or less | ||
| #12 | 35 A | 20 mV or less | ||
| #8 | 60 A | 12 mV or less | ||
| #4 | 110 A | 10 mV or less | ||
| #0 | 200 A | 10 mV or less |
Mechanical Characteristics
| Temperature Shock | Low Temperature | High Temperature | Consider the left low temperature and high temperature as one cycle and continuously perform 5 cycles. Leave low temperature and high temperature for 30 minutes or more. | ||||
|---|---|---|---|---|---|---|---|
| -55 +0°C | +125 +3°C | ||||||
| (1) There is no crack or breakage in connectors. (2) The withstand voltage test is passed after completion. | |||||||
| Humidity Resistance | Meets the following withstand voltage. | After exposing a pair of a connected connector and panel mount to a temperature of 71 ± 2°C and a relative humidity of 95 ± 3% for 14 days, perform the withstand voltage test listed in the left table for 5 minutes without drying. | |||||
| Test Classification Symbol | VAC (RMS) | ||||||
| INST | 300 | ||||||
| A | 750 | ||||||
| D | 1,350 | ||||||
| E | 1,875 | ||||||
| B | 2,775 | ||||||
| C | 4,500 | ||||||
| Corrosion | (1) There is no corrosion to damage the connection or separation of connectors, or base metal exposure. (2) Contact resistance measurement | After exposure to a salt spray at a temperature of 35°C and a concentration of 5% for 48 hours, wash with water, dry by leaving in an air circulation tank for 12 hours at 38 ±3°C, and then perform contact resistance and withstand voltage tests. | |||||
| Contact size | Test Current | Voltage drop (or less) | |||||
| #16 | 20A | 35 mV | |||||
| #12 | 35 | 30 | |||||
| #8 | 60 | 25 | |||||
| #4 | 110 | 20 | |||||
| #0 | 200 | 20 | |||||
| (3) Meets the following withstand voltage. | |||||||
| Test Classification Symbol | VAC (RMS) | Classification Symbol | VAC (RMS) | ||||
| INST | 400 | E | 2,500 | ||||
| A | 1,000 | B | 3,500 | ||||
| D | 1,800 | C | 6,000 | ||||
Environmental Characteristics
| Contact Single Unit Insertion/Removal Force | Contact size | Average | Maximum | Minimum | Measure insertion/removal force with a randomly chosen male and female. The average force must be the average value shown at left or less, 96% of all values must be the maximum value or less, and all values must be the minimum value or more. |
|---|---|---|---|---|---|
| #16 | 0.95 kg | 1.36 kg | 0.11 kg | ||
| #12 | 1.59 | 2.27 | 0.23 | ||
| #8 | 3.18 | 4.54 | 0.34 | ||
| #4 | 4.76 | 6.8 | 0.45 | ||
| #0 | 6.35 | 9.07 | 0.91 | ||
| Contact Holding Force | Contact size | Axial Load (kg) | Contact size | Axial Load (kg) | Withstands axial load in both directions shown at left. |
| #16 | 4.5 | #4 | 9.1 | ||
| #12 | 6.8 | #0 | 11.3 | ||
| #8 | 9.1 | ||||
| Vibration | (1) There is no current break for 10 μsec or more during the test. (2) The withstand voltage test is passed after completion. (3) There is no disconnection, crack or breakage in any part. | Couple a connector and a panel mount connected with wire in the normal way and perform a vibration test with MIL-STD-1344. Apply 100 mA current to the connector, check for current break in an appropriate way, and then perform a withstand voltage test and an external appearance test. | |||
| Shock | (1) Meets the required contact resistance after completion. (2) There is no crack, breakage, or looseness in any part. | Apply an acceleration of 50 G to the connector and the panel mount connected with wire at an angle of 90 degrees to each axial direction. | |||
| Life | (1) Meets the contact resistance requirements. (2) There is no electrical or mechanical abnormality. | Remove the coupling nut from the connector and perform insertion and removal 500 times at a speed not above 600 times per hour. | |||
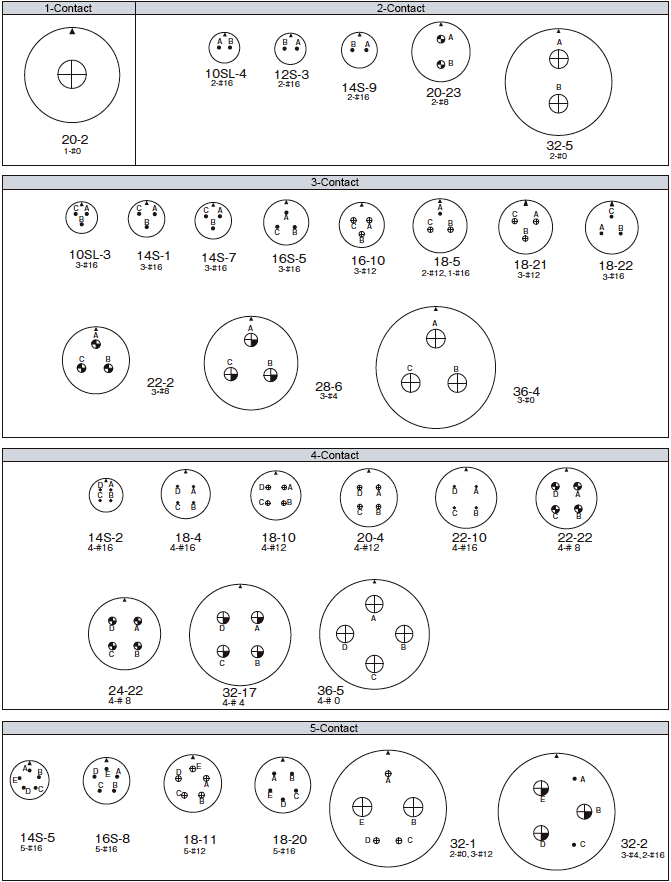
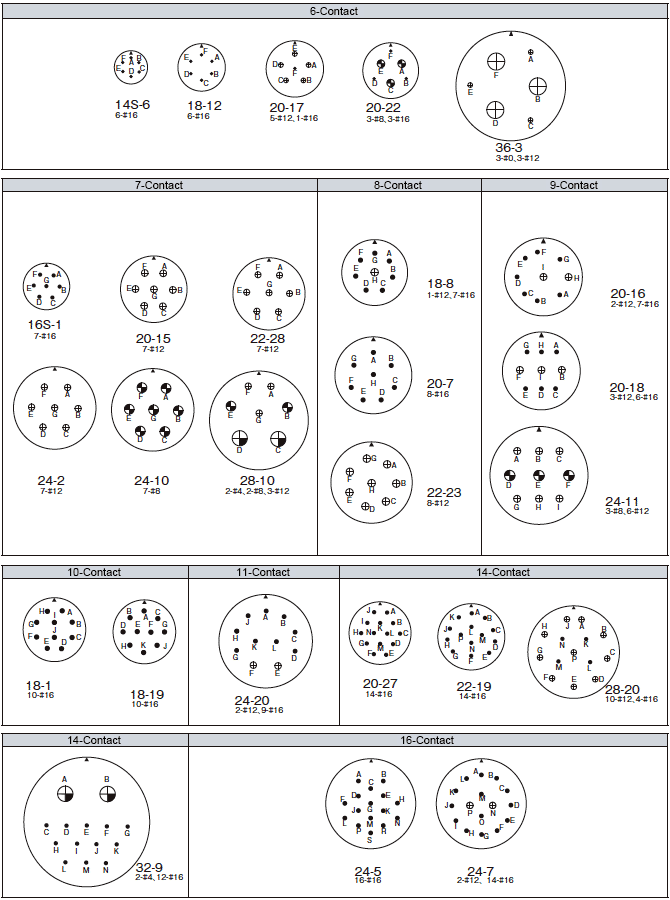
Contact arrangement table (in order of core number), a view from the coupling surface of the male (pin) connector.
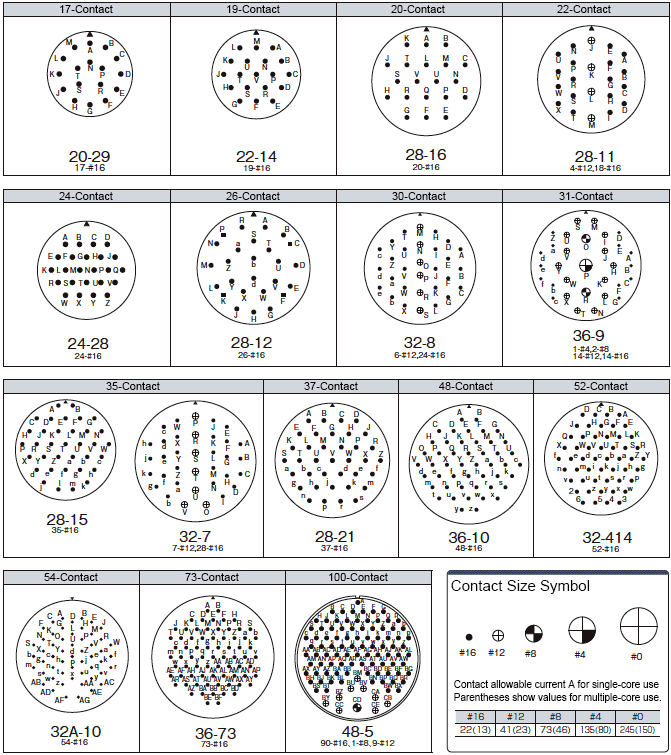
Arrangement No.
The shell size of the entire connector is at left. The arrangement number of its contacts is at right. Together they comprise the Arrangement No.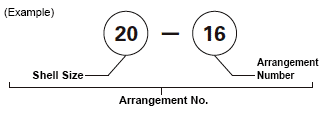
Configuration of Number of Cores
The size per contact is shown on the right. The number of contacts is shown on the left.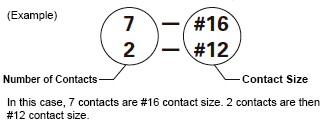
| Arrangement No. | Contact Shape | Contact Configuration | Rated Current (A) (Note 1) | Insulation Resistance MΩ (or more) | Rated Voltage (*2) (*3) | Test Classification (Note 4) | ||||
|---|---|---|---|---|---|---|---|---|---|---|
| Shell Size | Arrangement Number | Total Number of Cores | Configuration of Number of Cores | Contact Size | VDC or less Characters are Contact No. | VAC (RMS) or less Characters are Contact No. ( ) is Withstand Voltage / VAC (RMS) | ||||
| 10SL | 3 | P Male (Pin) S Female (Socket) | 3 | 3 | #16 | 13 | 5,000 | 700 | 500 (2,000) | A |
| 4 | 2 | 2 | ||||||||
| 12S | 3 | 2 | 2 | |||||||
| 14S | 1 | 3 | 3 | |||||||
| 2 | 4 | 4 | 250 | 200 (1,000) | INST | |||||
| 5 | 5 | 5 | ||||||||
| 6 | 6 | 6 | ||||||||
| 7 | 3 | 3 | 700 | 500 (2,000) | A | |||||
| 9 | 2 | 2 | ||||||||
| 16S | 1 | 7 | 7 | |||||||
| 5 | 3 | 3 | ||||||||
| 8 | 5 | 5 | ||||||||
| 16 | 10 | 3 | 3 | #12 | 23 | |||||
| 18 | 1 | 10 | 10 | #16 | 13 | BCFG-700, Other-250 | BCFG-500 (2,000),Other-200 (1,000) | A (BCFG) INST (Other) | ||
| 4 | 4 | 4 | 1,250 | 900 (2,800) | D | |||||
| 5 | 3 | 2 | #12 | 23 | ||||||
| 1 | #16 | 13 | ||||||||
| 8 | 8 | 1 | #12 | 23 | 700 | 500 (2,000) | A | |||
| 7 | #16 | 13 | ||||||||
| 10 | 4 | 4 | #12 | 23 | ||||||
| 11 | 5 | 5 | ||||||||
| 12 | 6 | 6 | #16 | 13 | ||||||
| 19 | 10 | 10 | ||||||||
| 20 | 5 | 5 | ||||||||
| 21 | 3 | 3 | #12 | 23 | ||||||
| 22 | 3 | 3 | #16 | 13 | 1,250 | 900 (2,800) | D | |||
| 20 | 2 | 1 | 1 | #0 | 150 | ABHG-1250, CDEF-700 | ABHG-900 (2,800), CDEF-500 (2,000) | D (ABHG) A (CDEF) | ||
| 4 | 4 | 4 | #12 | 23 | 700 | 500 (2,000) | A | |||
| 7 | 8 | 8 | #16 | 13 | ||||||
| 15 | 7 | 7 | #12 | 23 | ||||||
| 16 | 9 | 2 | ||||||||
| 7 | #16 | 13 | ||||||||
| 17 | 6 | 5 | #12 | 23 | ||||||
| 1 | #16 | 13 | ||||||||
| 18 | 9 | 3 | #12 | 23 | ||||||
| 6 | #16 | 13 | ||||||||
| 22 | 6 | 3 | #8 | 46 | ||||||
| 3 | #16 | 13 | ||||||||
| 23 | 2 | 2 | #8 | 46 | ||||||
| 27 | 14 | 14 | #16 | 13 | ||||||
| 29 | 17 | 17 | ||||||||
| 22 | 2 | 3 | 3 | #8 | 46 | 1,250 | 900 (2,800) | D | ||
| 10 | 4 | 4 | #16 | 13 | 1,750 | 1,250 (3,500) | E | |||
| 14 | 19 | 19 | 700 | 500 (2,000) | A | |||||
| 19 | 14 | 14 | ||||||||
| 22 | 4 | 4 | #8 | 46 | ||||||
| 23 | 8 | 8 | #12 | 23 | H-1250, Other-700 | H-900 (2,800), Other-500 (2,000) | D (H) A (Other) | |||
| 28 | 7 | 7 | 700 | 500 (2,000) | A | |||||
| 24 | 2 | 7 | 7 | 1,250 | 900 (2,800) | D | ||||
| 5 | 16 | 16 | #16 | 13 | 700 | 500 (2,000) | A | |||
| 7 | 16 | 2 | #12 | 23 | ||||||
| 14 | #16 | 13 | ||||||||
| 10 | 7 | 7 | #8 | 46 | ||||||
| 11 | 9 | 3 | ||||||||
| 6 | #12 | 23 | ||||||||
| 20 | 11 | 2 | 1,250 | 900 (2,800) | D | |||||
| 9 | #16 | 13 | ||||||||
| 22 | 4 | 4 | #8 | 46 | ||||||
| 28 | 24 | 24 | #16 | 13 | 250 | 200 (1000) | INST | |||
| 28 | 6 | P Male (Pin) S Female (Socket) | 3 | 3 | #4 | 80 | 5,000 | 1,250 | 900 (2,800) | D |
| 10 | 7 | 2 | G-1250, Other-700 | G-900 (2,800), 2 #8 46 Other-500 (2,000) | D (G) A (Other) | |||||
| 2 | #8 | 46 | ||||||||
| 3 | #12 | 13 | ||||||||
| 11 | 22 | 4 | 700 | 500 (2,000) | A | |||||
| 18 | #16 | 13 | ||||||||
| 12 | 26 | 26 | ||||||||
| 15 | 35 | 35 | ||||||||
| 16 | 20 | 20 | ||||||||
| 20 | 14 | 10 | #12 | 23 | ||||||
| 4 | #16 | 13 | ||||||||
| 21 | 37 | 37 | ||||||||
| 32 | 1 | 5 | 2 | #0 | 150 | A-1750, Other-1250 | A-1250 (3,500), Other-900 (2,800) | (A) D (Other) | ||
| 3 | #12 | 23 | ||||||||
| 2 | 5 | 3 | #4 | 80 | 1,750 | 1,250 (3,500) | E | |||
| 2 | #16 | 13 | ||||||||
| 5 | 2 | 2 | #0 | 150 | 1,250 | 900 (2,800) | D | |||
| 7 | 35 | 7 | #12 | 23 | ABhj-250, Other-700 | ABhj-200 (1,000) Other-500 (2,000) | INST (ABhj) A (Other) | |||
| 28 | #16 | 13 | ||||||||
| 8 | 30 | 6 | #12 | 23 | 700 | 500 (2,000) | A | |||
| 24 | #16 | 13 | ||||||||
| 9 | 14 | 2 | #4 | 80 | 1,250 | 900 (2,800) | D | |||
| 12 | #16 | 13 | ||||||||
| 32A | 10 | 54 | 54 | 700 | 500 (2,000) | A | ||||
| 32 | 17 | 4 | 4 | #4 | 80 | 1,250 | 900 (2,800) | D | ||
| 414 | 52 | 52 | #16 | 13 | 700 | 500 (2,000) | A | |||
| 36 | 3 | 6 | 3 | #0 | 150 | 1,250 | 900 (2,800) | D | ||
| 3 | #12 | 23 | ||||||||
| 4 | 3 | 3 | #0 | 150 | A-1250, BC-700 | A-900 (2,800), BC-500 (2,000) | D (A) A (BC) | |||
| 5 | 4 | 4 | 700 | 500 (2,000) | A | |||||
| 9 | 31 | 1 | #4 | 80 | ||||||
| 2 | #8 | 46 | ||||||||
| 14 | #12 | 23 | ||||||||
| 14 | #16 | 13 | ||||||||
| 10 | 48 | 48 | ||||||||
| 73 | 73 | 73 | ||||||||
| 48 | 5 | 100 | 1 | #8 | 46 | |||||
| 9 | #12 | 23 | ||||||||
| 90 | #16 | 13 | ||||||||
*2: The rated voltage will change depending on contact arrangement rather than on the size of contacts or shells.
*3 The rated voltage may be different with each contact even in the same connector.
*4 Characteristics will change depending on test classification.
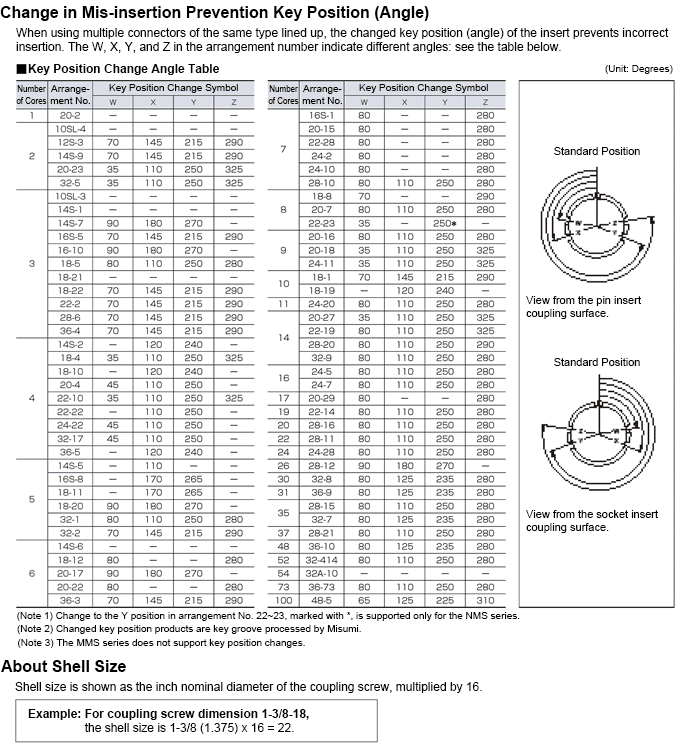
Key Position (Angle) Change for Prevention of Mistaken Insertion
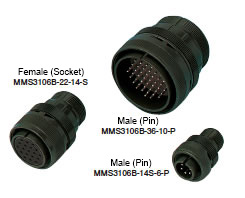
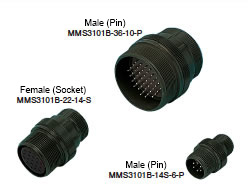
Straight Connector
Outline Drawing
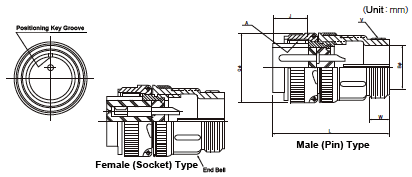
| Shell Size | Coupling Screw A Thread | Dimensions (mm) | |||||
|---|---|---|---|---|---|---|---|
| Cable Entry øB ±0.3 | Effective Thread Length J ±0.3 | Overall Length L or less | Outer Diameter Q ±0.8 | Conduit Screw V Thread | Thread Length W or more | ||
| 10SL | 5/8-24UNEF-2B | 9.6 | 13.49 | 34.9 | 22.22 | 5/8-24UNEF-2A | 9.53 |
| 12S | 3/4-20UNEF-2B | 9.6 | 13.5 | 42.8 | 25.4 | 5/8-24UNEF-2A | 9.5 |
| 14S | 7/8-20UNEF-2B | 12.5 | 13.5 | 42.8 | 28.6 | 3/4-20UNEF-2A | 9.5 |
| 16S | 1-20UNEF-2B | 15.6 | 13.5 | 42.8 | 31.8 | 7/8-20UNEF-2A | 9.5 |
| 16 | 1-20UNEF-2B | 15.6 | 18.3 | 52.4 | 31.8 | 7/8-20UNEF-2A | 9.5 |
| 18 | 1-1/8-18UNEF-2B | 20.2 | 18.3 | 52.4 | 34.1 | 1-20UNEF-2A | 9.5 |
| 20 | 1-1/4-18UNEF-2B | 23.0 | 18.3 | 55.6 | 37.3 | 1-3/16-18UNEF-2A | 9.5 |
| 22 | 1-3/8-18UNEF-2B | 23.2 | 18.3 | 55.6 | 40.5 | 1-3/16-18UNEF-2A | 9.5 |
| 24 | 1-1/2-18UNEF-2B | 29.5 | 18.3 | 58.7 | 43.7 | 1-7/16-18UNEF-2A | 9.5 |
| 28 | 1-3/4-18UNS-2B | 29.8 | 18.3 | 58.7 | 50.0 | 1-7/16-18UNEF-2A | 9.5 |
| 32 | 2-18UNS-2B | 37.5 | 18.3 | 61.9 | 56.4 | 1-3/4-18UNS-2A | 11.1 |
| 36 | 2-1/4-16UN-2B | 43.8 | 18.3 | 61.9 | 62.7 | 2-18UNS-2A | 12.7 |
| 48 | 3-16UN-2B | 69.1 | 18.3 | 65.1 | 81.8 | 3-16UN-2A | 15.9 |
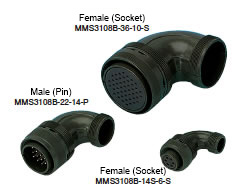
Angle Connector
Outline Drawing
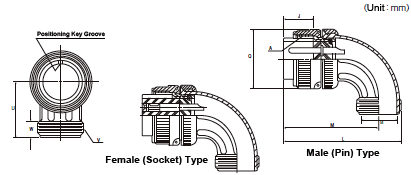
| Shell Size | Coupling Screw A Thread | Dimensions (mm) | |||||||
|---|---|---|---|---|---|---|---|---|---|
| Cable Entry B ±0.3 | Effective Thread Length J ±0.3 | Overall Length L or less | M ±0.8 | Outer Diameter Q ±0.8 | U ±0.8 | Conduit Screw V Thread | Thread Length W or more | ||
| 12S | 3/4-20UNEF-2B | 9.6 | 13.5 | 50.8 | 41.7 | 25.4 | 25.4 | 5/8-24UNEF-2A | 9.5 |
| 14S | 7/8-20UNEF-2B | 12.5 | 13.5 | 54.0 | 43.3 | 28.6 | 27.0 | 3/4-20UNEF-2A | 9.5 |
| 16S | 1-20UNEF-2B | 15.6 | 13.5 | 60.3 | 48.0 | 31.8 | 28.6 | 7/8-20UNEF-2A | 9.5 |
| 16 | 1-20UNEF-2B | 15.6 | 18.3 | 65.1 | 52.8 | 31.8 | 28.6 | 7/8-20UNEF-2A | 9.5 |
| 18 | 1-1/8-18UNEF-2B | 18.6 | 18.3 | 68.3 | 54.4 | 34.1 | 32.1 | 1-20UNEF-2A | 9.5 |
| 20 | 1-1/4-18UNEF-2B | 23.0 | 18.3 | 77.0 | 60.7 | 37.3 | 33.7 | 1-3/16-18UNEF-2A | 9.5 |
| 22 | 1-3/8-18UNEF-2B | 23.2 | 18.3 | 77.0 | 60.7 | 40.5 | 33.3 | 1-3/16-18UNEF-2A | 9.5 |
| 24 | 1-1/2-18UNEF-2B | 28.0 | 18.3 | 86.5 | 67.1 | 43.7 | 34.9 | 1-7/16-18UNEF-2A | 9.5 |
| 28 | 1-3/4-18UNS-2B | 28.2 | 18.3 | 86.5 | 67.1 | 50.0 | 38.5 | 1-7/16-18UNEF-2A | 9.5 |
| 32,32A | 2-18UNS-2B | 35.9 | 18.3 | 95.2 | 71.8 | 56.4 | 46.4 | 1-3/4-18UNS-2A | 11.1 |
| 36 | 2-1/4-16UN-2B | 42.2 | 18.3 | 100.0 | 73.4 | 62.7 | 51.2 | 2-18UNS-2A | 12.7 |
| 48 | 3-16UN-2B | 65.9 | 18.3 | 125.4 | 86.5 | 81.8 | 59.1 | 3-16UN-2A | 15.9 |
Relay Connector
Outline Drawing
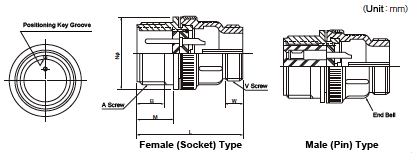
| Shell Size | Coupling Screw A Thread | Dimensions (mm) | |||||
|---|---|---|---|---|---|---|---|
| Effective Thread B or more | Overall Length L or less | Length to Flange M +0.4 -0 | Outer Diameter N or less | Conduit Screw V Thread | Thread Length W or more | ||
| 12S | 3/4-20UNEF-2A | 9.5 | 42.88 | 14.3 | 26.97 | 5/8-24UNEF-2A | 25.4 |
| 14S | 7/8-20UNEF-2A | 9.5 | 42.88 | 14.3 | 29.36 | 3/4-20UNEF-2A | 27.0 |
| 16S | 1-20UNEF-2A | 9.5 | 42.88 | 14.3 | 31.75 | 7/8-20UNEF-2A | 28.6 |
| 16 | 1-20UNEF-2A | 15.9 | 52.37 | 19.0 | 31.75 | 7/8-20UNEF-2A | 28.6 |
| 18 | 1-1/8-18UNEF-2A | 15.9 | 52.37 | 19.0 | 34.14 | 1-20UNEF-2A | 32.1 |
| 20 | 1-1/4-18UNEF-2A | 15.9 | 55.58 | 19.0 | 37.31 | 1-3/16-18UNEF-2A | 33.7 |
| 22 | 1-3/8-18UNEF-2A | 15.9 | 55.58 | 19.0 | 40.49 | 1-3/16-18UNEF-2A | 33.3 |
| 24 | 1-1/2-18UNEF-2A | 15.9 | 58.72 | 19.0 | 43.66 | 1-7/16-18UNEF-2A | 34.9 |
| 28 | 1-3/4-18UNS-2A | 15.9 | 58.72 | 19.0 | 50.01 | 1-7/16-18UNEF-2A | 38.5 |
| 32,32A | 2-18UNS-2A | 15.9 | 61.93 | 19.0 | 56.36 | 1-3/4UNS-2A | 46.4 |
| 36 | 2-1/4-16UN-2A | 15.9 | 61.93 | 19.0 | 62.71 | 2-18UNS-2A | 51.2 |
| 48 | 3-16UN-2A | 15.9 | 65.07 | 15.9 | 81.76 | 3-16UN-2A | 59.1 |
Panel Mount
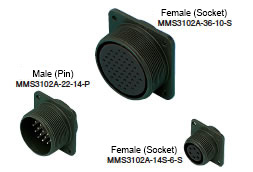
Outline Drawing
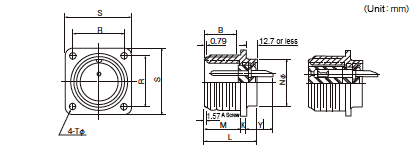
| Shell Size | A Thread | Dimensions (mm) | |||||||
|---|---|---|---|---|---|---|---|---|---|
| B or more | K or less | L or less | M +0.79 | øN +0 | R ±0.13 | S ±0.79 | øT +0.25 | ||
| 10SL | 5/8-24UNEF-2A | 9.53 | 2.1 | 21.9 | 14.28 | 15.9 | 18.26 | 25.4 | 3.05 |
| 12S | 3/4-20UNEF-2A | 9.52 | 2.4 | 24.3 | 14.27 | 19.86 | 20.62 | 27.79 | 3.05 |
| 14S | 7/8-20UNEF-2A | 9.52 | 2.4 | 24.3 | 14.27 | 23.01 | 23.01 | 30.18 | 3.05 |
| 16S | 1-20UNEF-2A | 9.52 | 2.4 | 24.3 | 14.27 | 24.61 | 24.61 | 32.54 | 3.05 |
| 16 | 1-20UNEF-2A | 15.88 | 2.4 | 29.1 | 19.05 | 24.61 | 24.61 | 32.54 | 3.05 |
| 18 | 1-1/8-18UNEF-2A | 15.88 | 3.0 | 28.6 | 19.05 | 26.97 | 26.97 | 34.92 | 3.05 |
| 20 | 1-1/4-18UNEF-2A | 15.88 | 3.0 | 29.4 | 19.05 | 29.36 | 29.36 | 38.10 | 3.05 |
| 22 | 1-3/8-18UNEF-2A | 15.88 | 3.0 | 29.4 | 19.05 | 31.75 | 31.75 | 41.28 | 3.05 |
| 24 | 1-1/2-18UNEF-2A | 15.88 | 3.0 | 33.4 | 20.62 | 34.92 | 34.92 | 44.45 | 3.73 |
| 28 | 1-3/4-18UNS-2A | 15.88 | 3.0 | 33.4 | 20.62 | 39.67 | 39.67 | 50.80 | 3.73 |
| 32,32A | 2-18UNS-2A | 15.88 | 4.3 | 33.4 | 22.22 | 44.45 | 44.45 | 57.15 | 4.39 |
| 36 | 2-1/4-16UN-2A | 15.88 | 4.3 | 33.4 | 22.22 | 49.23 | 49.23 | 63.50 | 4.39 |
| 48 | 3-16UN-2A | 15.88 | 4.3 | 34.2 | 22.22 | 66.68 | 66.68 | 82.55 | 4.39 |
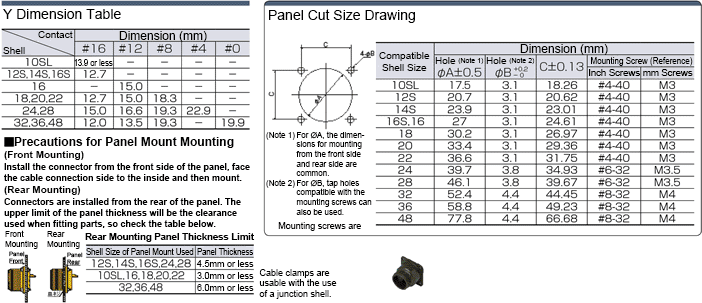
Current Capacity Applicable to Entire Connector
| Total Number of Cores | 1 | 2 | 3 | 4 | 5 | 6 | 7 | 8 | 9 | 10 | 11 | 12 | 13 | 14 |
|---|---|---|---|---|---|---|---|---|---|---|---|---|---|---|
| Reduction Ratio (%) | 1 | 0.943 | 0.886 | 0.829 | 0.771 | 0.714 | 0.657 | 0.6 | 0.543 | 0.486 | 0.429 | 0.371 | 0.314 | 0.257 |
Rated current per contact x number of cores x reduction ratio = entire connector allowable current
13 A x 2 cores x 0.943 = 24.518 A
(For Arrangement No. 12S-3)
Therefore, 24.518 A can be applied to the whole connector.
(A contact rated current x number of A contact cores + B contact rated current x number of B contact cores) x reduction ratio (for total number of cores) = entire connector allowable current
(23 A x 2 cores + 13 A x 7 cores) x 0.543 = 74.391 A
(For Arrangement No. 20-16)
Therefore, 74.391 A can be applied to the whole connector.
Contact rated current x number of cores x 20% = entire connector allowable current
13 A x 17 cores x 0.2 = 44.2 A
(For Arrangement No. 20-29)
Therefore, 44.2 A can be applied to the whole connector.
(A contact rated current x number of A contact cores + B contact rated current x number of B contact cores) x 20% = entire connector allowable current
(23 A x 4 cores + 13 A x 18 cores) x 0.2 = 65.2 A
(For Arrangement No. 28-11)
Therefore, 65.2 A can be applied to the whole connector.
Soldering Method

Basic information
| Type | Other | Color | Black |
|---|
This page is Rubber Bushing for MS Connector Cable Clamp MMS3420, part number MMS3420-4.
You can find the detail information about specifications and dimensions on part number MMS3420-4.
- The specifications and dimensions of some parts may not be fully covered. For exact details, refer to manufacturer catalogs .
Variation of this product
| Part Number |
|---|
| MMS3420-12 |
| MMS3420-16 |
| MMS3420-20 |
| MMS3420-24 |
| MMS3420-6 |
| MMS3420-8 |
| Part Number | Standard Unit Price | Minimum order quantity | Volume Discount | Standard Shipping Days ? | Inner Diameter (Cable Extraction Port Diameter) (mm) |
|---|---|---|---|---|---|
1.23 € | 1 | Available | 5 Days | 15.88 | |
1.17 € | 1 | Available | 5 Days | 19.05 | |
1.43 € | 1 | Available | 5 Days | 23.80 | |
1.68 € | 1 | Available | 5 Days | 31.75 | |
0.86 € | 1 | Available | 5 Days | 7.92 | |
0.75 € | 1 | Available | 5 Days | 11.10 |
